控制流程
Workflow 會執行一系列預先定義的任務,而你可以控制流程的執行方式。任務會分成多個步驟,並可依需求使用不同方式執行。這些步驟可以依序或平行執行,也可以根據條件採用不同路徑。
每個步驟都會透過已定義的結構描述連接至 Workflow 中的下一個步驟,確保資料受到控制且維持一致。
核心原則「核心原則」的直接連結
- 第一個步驟的
inputSchema必須符合 Workflow 的inputSchema。 - 最後一個步驟的
outputSchema必須符合 Workflow 的outputSchema。 - 每個步驟的
outputSchema必須符合下一個步驟的inputSchema。- 若不符合,請使用輸入資料對應,將資料轉換為所需形式。
使用 .then() 串接步驟「chaining-steps-with-then」的直接連結
使用 .then() 依序執行步驟,讓每個步驟都能存取前一步驟的結果。

const step1 = createStep({
  inputSchema: z.object({
    message: z.string(),
  }),
  outputSchema: z.object({
    formatted: z.string(),
  }),
})

const step2 = createStep({
  inputSchema: z.object({
    formatted: z.string(),
  }),
  outputSchema: z.object({
    emphasized: z.string(),
  }),
})

export const testWorkflow = createWorkflow({
  inputSchema: z.object({
    message: z.string(),
  }),
  outputSchema: z.object({
    emphasized: z.string(),
  }),
})
  .then(step1)
  .then(step2)
  .commit()
使用 .parallel() 同時執行步驟「simultaneous-steps-with-parallel」的直接連結
使用 .parallel() 同時執行步驟。所有平行步驟都必須完成,Workflow 才會繼續執行下一個步驟。定義後續步驟的 inputSchema 時,會使用每個步驟的 id;該 id 也會成為 inputData 物件中的鍵,用來存取先前步驟的值。後續步驟可以參照或合併平行步驟的輸出。

const step1 = createStep({
  id: 'step-1',
})

const step2 = createStep({
  id: 'step-2',
})

const step3 = createStep({
  id: 'step-3',
  inputSchema: z.object({
    'step-1': z.object({
      formatted: z.string(),
    }),
    'step-2': z.object({
      emphasized: z.string(),
    }),
  }),
  outputSchema: z.object({
    combined: z.string(),
  }),
  execute: async ({ inputData }) => {
    const { formatted } = inputData['step-1']
    const { emphasized } = inputData['step-2']
    return {
      combined: `${formatted} | ${emphasized}`,
    }
  },
})

export const testWorkflow = createWorkflow({
  inputSchema: z.object({
    message: z.string(),
  }),
  outputSchema: z.object({
    combined: z.string(),
  }),
})
  .parallel([step1, step2])
  .then(step3)
  .commit()
輸出結構「輸出結構」的直接連結
步驟平行執行時,輸出會是一個物件,其中每個鍵都是步驟的 id,而值則是該步驟的輸出。你可以個別存取每個平行步驟的結果。
const step1 = createStep({
  id: 'format-step',
  inputSchema: z.object({ message: z.string() }),
  outputSchema: z.object({ formatted: z.string() }),
  execute: async ({ inputData }) => ({
    formatted: inputData.message.toUpperCase(),
  }),
})

const step2 = createStep({
  id: 'count-step',
  inputSchema: z.object({ message: z.string() }),
  outputSchema: z.object({ count: z.number() }),
  execute: async ({ inputData }) => ({
    count: inputData.message.length,
  }),
})

const step3 = createStep({
  id: 'combine-step',
  // The inputSchema must match the structure of parallel outputs
  inputSchema: z.object({
    'format-step': z.object({ formatted: z.string() }),
    'count-step': z.object({ count: z.number() }),
  }),
  outputSchema: z.object({ result: z.string() }),
  execute: async ({ inputData }) => {
    // Access each parallel step's output by its id
    const formatted = inputData['format-step'].formatted
    const count = inputData['count-step'].count
    return {
      result: `${formatted} (${count} characters)`,
    }
  },
})

export const testWorkflow = createWorkflow({
  id: 'parallel-output-example',
  inputSchema: z.object({ message: z.string() }),
  outputSchema: z.object({ result: z.string() }),
})
  .parallel([step1, step2])
  .then(step3)
  .commit()

// When executed with { message: "hello" }
// The parallel output structure will be:
// {
//   "format-step": { formatted: "HELLO" },
//   "count-step": { count: 5 }
// }
重點:
- 每個平行步驟的輸出都以其
id作為鍵 - 所有平行步驟會同時執行
- 下一個步驟會收到包含所有平行步驟輸出的物件
- 後續步驟的
inputSchema必須定義成符合此結構
處理步驟失敗「處理步驟失敗」的直接連結
若任何平行步驟擲回錯誤,整個平行區塊都會失敗。若要建立可容許部分步驟失敗的韌性平行 Workflow(例如多個研究 Agent 中,某個 Agent 的驗證權杖可能已過期),請在步驟本身使用 try/catch 處理錯誤:
const resilientStep = createStep({
  id: 'researcher',
  inputSchema: z.object({ query: z.string() }),
  outputSchema: z.object({
    brief: z.string().nullable(),
    failed: z.boolean(),
  }),
  execute: async ({ inputData }) => {
    try {
      const result = await fetchExternalData(inputData.query)
      return { brief: result, failed: false }
    } catch {
      return { brief: null, failed: true }
    }
  },
})
如此一來,步驟一律會以具型別的結果成功完成,而下游步驟可以濾除失敗的結果:
const writerStep = createStep({
  id: 'writer',
  inputSchema: z.object({
    'researcher-a': z.object({ brief: z.string().nullable(), failed: z.boolean() }),
    'researcher-b': z.object({ brief: z.string().nullable(), failed: z.boolean() }),
  }),
  outputSchema: z.object({ synthesis: z.string() }),
  execute: async ({ inputData }) => {
    const briefs = Object.values(inputData)
      .filter(v => !v.failed && v.brief)
      .map(v => v.brief)
    return { synthesis: briefs.join('; ') }
  },
})
請參閱選擇正確模式,瞭解何時該使用 .parallel() 或 .foreach()。
使用 .branch() 建立條件邏輯「conditional-logic-with-branch」的直接連結
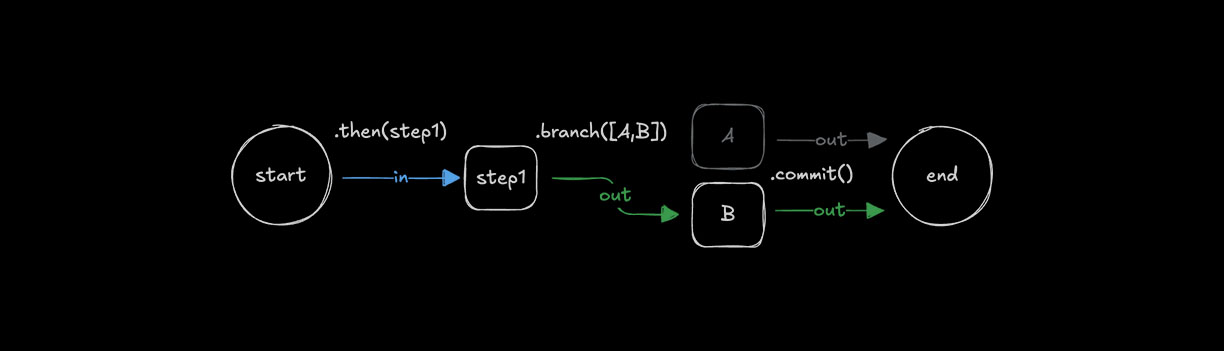
使用 .branch() 根據條件選擇要執行的步驟。分支中的所有步驟都需要相同的 inputSchema 與 outputSchema,因為分支需要一致的結構描述,Workflow 才能採用不同路徑。
const step1 = createStep({...})

const stepA = createStep({
  inputSchema: z.object({
    value: z.number()
  }),
  outputSchema: z.object({
    result: z.string()
  })
});

const stepB = createStep({
  inputSchema: z.object({
    value: z.number()
  }),
  outputSchema: z.object({
    result: z.string()
  })
});

export const testWorkflow = createWorkflow({
  inputSchema: z.object({
    value: z.number()
  }),
  outputSchema: z.object({
    result: z.string()
  })
})
  .then(step1)
  .branch([
    [async ({ inputData: { value } }) => value > 10, stepA],
    [async ({ inputData: { value } }) => value <= 10, stepB]
  ])
  .commit();
輸出結構「輸出結構」的直接連結
使用條件分支時,只會執行第一個條件評估為 true 的分支。輸出結構與 .parallel() 類似,結果會以已執行步驟的 id 作為鍵。
const step1 = createStep({
  id: 'initial-step',
  inputSchema: z.object({ value: z.number() }),
  outputSchema: z.object({ value: z.number() }),
  execute: async ({ inputData }) => inputData,
})

const highValueStep = createStep({
  id: 'high-value-step',
  inputSchema: z.object({ value: z.number() }),
  outputSchema: z.object({ result: z.string() }),
  execute: async ({ inputData }) => ({
    result: `High value: ${inputData.value}`,
  }),
})

const lowValueStep = createStep({
  id: 'low-value-step',
  inputSchema: z.object({ value: z.number() }),
  outputSchema: z.object({ result: z.string() }),
  execute: async ({ inputData }) => ({
    result: `Low value: ${inputData.value}`,
  }),
})

const finalStep = createStep({
  id: 'final-step',
  // The inputSchema must account for either branch's output
  inputSchema: z.object({
    'high-value-step': z.object({ result: z.string() }).optional(),
    'low-value-step': z.object({ result: z.string() }).optional(),
  }),
  outputSchema: z.object({ message: z.string() }),
  execute: async ({ inputData }) => {
    // Only one branch will have executed
    const result = inputData['high-value-step']?.result || inputData['low-value-step']?.result
    return { message: result }
  },
})

export const testWorkflow = createWorkflow({
  id: 'branch-output-example',
  inputSchema: z.object({ value: z.number() }),
  outputSchema: z.object({ message: z.string() }),
})
  .then(step1)
  .branch([
    [async ({ inputData }) => inputData.value > 10, highValueStep],
    [async ({ inputData }) => inputData.value <= 10, lowValueStep],
  ])
  .then(finalStep)
  .commit()

// When executed with { value: 15 }
// Only the high-value-step executes, output structure:
// {
//   "high-value-step": { result: "High value: 15" }
// }

// When executed with { value: 5 }
// Only the low-value-step executes, output structure:
// {
//   "low-value-step": { result: "Low value: 5" }
// }
重點:
- 依條件評估順序,只會執行一個分支
- 輸出會以已執行步驟的
id作為鍵 - 後續步驟應處理所有可能的分支輸出
- 當下一個步驟需要處理多個可能的分支時,請在
inputSchema中使用選擇性欄位 - 條件會依定義順序進行評估
輸入資料對應「輸入資料對應」的直接連結
使用 .then()、.parallel() 或 .branch() 時,有時必須轉換前一步驟的輸出,使其符合下一個步驟的輸入。在這些情況下,你可以使用 .map() 存取 inputData 並加以轉換,為下一個步驟建立合適的資料形式。

const step1 = createStep({...});
const step2 = createStep({...});

export const testWorkflow = createWorkflow({...})
  .then(step1)
  .map(async ({ inputData }) => {
    const { foo } = inputData;
    return {
      bar: `new ${foo}`,
    };
  })
  .then(step2)
  .commit();
.map() 方法提供額外的輔助函式,可處理更複雜的對應情境。
可用的輔助函式:
getStepResult():存取特定步驟的完整輸出getInitData<any>():存取 Workflow 的初始輸入資料mapVariable():使用宣告式物件語法擷取欄位並重新命名
Parallel 與 Branch 輸出「Parallel 與 Branch 輸出」的直接連結
處理 .parallel() 或 .branch() 的輸出時,可以先使用 .map() 轉換資料結構,再將資料傳給下一個步驟。需要攤平或重新安排輸出結構時,此方法特別實用。
export const testWorkflow = createWorkflow({...})
  .parallel([step1, step2])
  .map(async ({ inputData }) => {
    // Transform the parallel output structure
    return {
      combined: `${inputData["step1"].value} - ${inputData["step2"].value}`
    };
  })
  .then(nextStep)
  .commit();
你也可以使用 .map() 提供的輔助函式:
export const testWorkflow = createWorkflow({...})
  .branch([
    [condition1, stepA],
    [condition2, stepB]
  ])
  .map(async ({ inputData, getStepResult }) => {
    // Access specific step results
    const stepAResult = getStepResult("stepA");
    const stepBResult = getStepResult("stepB");

    // Return the result from whichever branch executed
    return stepAResult || stepBResult;
  })
  .then(nextStep)
  .commit();
循環步驟「循環步驟」的直接連結
Workflow 支援多種循環方法,可重複步驟直到或只要條件成立,也可以逐一處理陣列。循環可與 .then() 等其他控制方法搭配使用。
使用 .dountil() 循環「looping-with-dountil」的直接連結
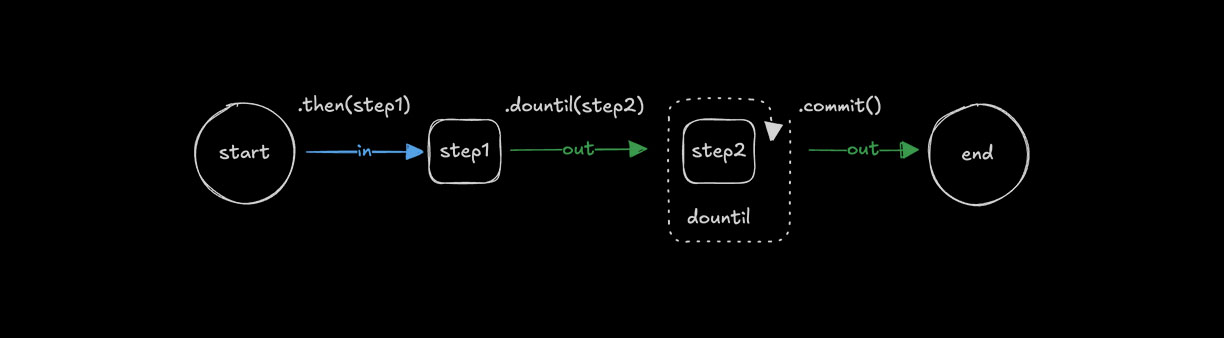
使用 .dountil() 重複執行步驟,直到條件變為 true。
const step1 = createStep({...});

const step2 = createStep({
  execute: async ({ inputData }) => {
    const { number } = inputData;
    return {
      number: number + 1
    };
  }
});

export const testWorkflow = createWorkflow({})
  .then(step1)
  .dountil(step2, async ({ inputData: { number } }) => number > 10)
  .commit();
使用 .dowhile() 循環「looping-with-dowhile」的直接連結
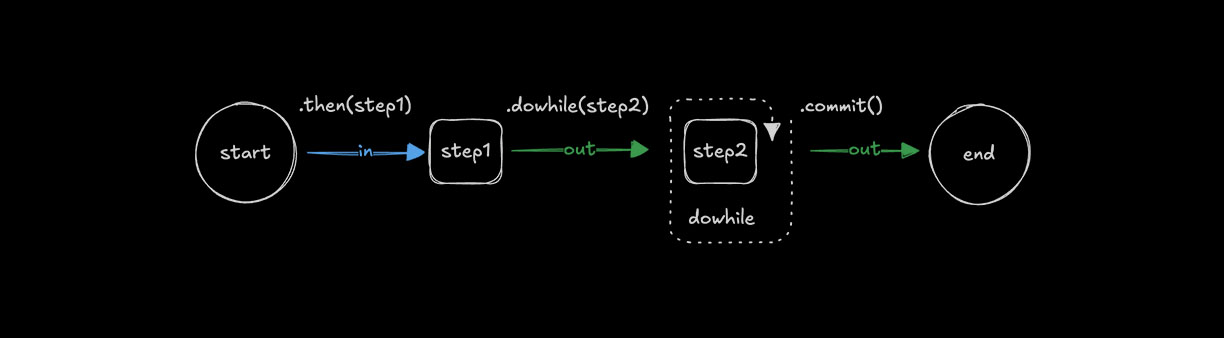
使用 .dowhile(),在條件維持 true 時重複執行步驟。
const step1 = createStep({...});

const step2 = createStep({
  execute: async ({ inputData }) => {
    const { number } = inputData;
    return {
      number: number + 1
    };
  }
});

export const testWorkflow = createWorkflow({})
  .then(step1)
  .dowhile(step2, async ({ inputData: { number } }) => number < 10)
  .commit();
使用 .foreach() 循環「looping-with-foreach」的直接連結
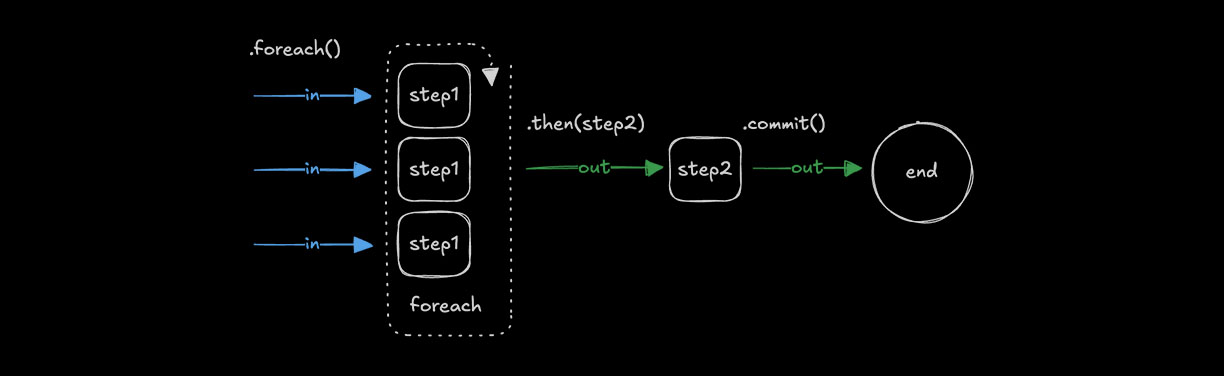
使用 .foreach() 對陣列中的每個項目執行相同步驟。輸入必須是 array 型別,循環才能逐一處理其中的值,並對每個值套用步驟邏輯。如需選擇 .foreach() 或其他方法的指引,請參閱選擇正確模式。
const step1 = createStep({
  inputSchema: z.string(),
  outputSchema: z.string(),
  execute: async ({ inputData }) => {
    return inputData.toUpperCase();
  }
});

const step2 = createStep({...});

export const testWorkflow = createWorkflow({
  inputSchema: z.array(z.string()),
  outputSchema: z.array(z.string())
})
  .foreach(step1)
  .then(step2)
  .commit();
輸出結構「輸出結構」的直接連結
.foreach() 方法一律會傳回包含每次迭代輸出的陣列。輸出順序與輸入順序相同。
const addTenStep = createStep({
  id: 'add-ten',
  inputSchema: z.object({ value: z.number() }),
  outputSchema: z.object({ value: z.number() }),
  execute: async ({ inputData }) => ({
    value: inputData.value + 10,
  }),
})

export const testWorkflow = createWorkflow({
  id: 'foreach-output-example',
  inputSchema: z.array(z.object({ value: z.number() })),
  outputSchema: z.array(z.object({ value: z.number() })),
})
  .foreach(addTenStep)
  .commit()

// When executed with [{ value: 1 }, { value: 22 }, { value: 333 }]
// Output: [{ value: 11 }, { value: 32 }, { value: 343 }]
並行數限制「並行數限制」的直接連結
使用 concurrency 控制處理的陣列項目數。預設值為 1,此時會依序執行步驟。提高此值可讓 .foreach() 同時處理多個項目。
const step1 = createStep({...})

export const testWorkflow = createWorkflow({...})
  .foreach(step1, { concurrency: 4 })
  .commit();
彙總 .foreach() 之後的結果「aggregating-results-after-foreach」的直接連結
由於 .foreach() 會輸出陣列,因此可以使用 .then() 或 .map() 彙總或轉換結果。接在 .foreach() 之後的步驟會收到整個陣列作為輸入。
const processItemStep = createStep({
  id: 'process-item',
  inputSchema: z.object({ value: z.number() }),
  outputSchema: z.object({ processed: z.number() }),
  execute: async ({ inputData }) => ({
    processed: inputData.value * 2,
  }),
})

const aggregateStep = createStep({
  id: 'aggregate',
  // Input is an array of outputs from foreach
  inputSchema: z.array(z.object({ processed: z.number() })),
  outputSchema: z.object({ total: z.number() }),
  execute: async ({ inputData }) => ({
    // Sum all processed values
    total: inputData.reduce((sum, item) => sum + item.processed, 0),
  }),
})

export const testWorkflow = createWorkflow({
  id: 'foreach-aggregate-example',
  inputSchema: z.array(z.object({ value: z.number() })),
  outputSchema: z.object({ total: z.number() }),
})
  .foreach(processItemStep)
  .then(aggregateStep) // Receives the full array from foreach
  .commit()

// When executed with [{ value: 1 }, { value: 2 }, { value: 3 }]
// After foreach: [{ processed: 2 }, { processed: 4 }, { processed: 6 }]
// After aggregate: { total: 12 }
你也可以使用 .map() 轉換陣列輸出:
export const testWorkflow = createWorkflow({...})
  .foreach(processItemStep)
  .map(async ({ inputData }) => ({
    // Transform the array into a different structure
    values: inputData.map(item => item.processed),
    count: inputData.length
  }))
  .then(nextStep)
  .commit();
串接多個 .foreach() 呼叫「chaining-multiple-foreach-calls」的直接連結
串接 .foreach() 呼叫時,每次呼叫都會處理前一步驟輸出的陣列。若陣列中的每個項目都需要依序經過多個步驟轉換,此做法會很有用。
const chunkStep = createStep({
  id: 'chunk',
  // Takes a document, returns an array of chunks
  inputSchema: z.object({ content: z.string() }),
  outputSchema: z.array(z.object({ chunk: z.string() })),
  execute: async ({ inputData }) => {
    // Split document into chunks
    const chunks = inputData.content.match(/.{1,100}/g) || []
    return chunks.map(chunk => ({ chunk }))
  },
})

const embedStep = createStep({
  id: 'embed',
  // Takes a single chunk, returns embedding
  inputSchema: z.object({ chunk: z.string() }),
  outputSchema: z.object({ embedding: z.array(z.number()) }),
  execute: async ({ inputData }) => ({
    embedding: [/* vector embedding */],
  }),
})

// For a single document that produces multiple chunks:
export const singleDocWorkflow = createWorkflow({
  id: 'single-doc-rag',
  inputSchema: z.object({ content: z.string() }),
  outputSchema: z.array(z.object({ embedding: z.array(z.number()) })),
})
  .then(chunkStep) // Returns array of chunks
  .foreach(embedStep) // Process each chunk -> array of embeddings
  .commit()
處理多份文件,且每份文件都會產生多個區塊時,你可以選擇以下做法:
選項 1:在單一步驟中處理所有文件並控制批次
const downloadAndChunkStep = createStep({
  id: "download-and-chunk",
  inputSchema: z.array(z.string()),  // Array of URLs
  outputSchema: z.array(z.object({ chunk: z.string(), source: z.string() })),
  execute: async ({ inputData: urls }) => {
    // Control batching/parallelization within the step
    const allChunks = [];
    for (const url of urls) {
      const content = await fetch(url).then(r => r.text());
      const chunks = content.match(/.{1,100}/g) || [];
      allChunks.push(...chunks.map(chunk => ({ chunk, source: url })));
    }
    return allChunks;
  }
});

export const multiDocWorkflow = createWorkflow({...})
  .then(downloadAndChunkStep)  // Returns flat array of all chunks
  .foreach(embedStep, { concurrency: 10 })  // Embed each chunk in parallel
  .commit();
選項 2:對文件使用 foreach 並彙總區塊,再對嵌入向量使用 foreach
const downloadStep = createStep({
  id: 'download',
  inputSchema: z.string(), // Single URL
  outputSchema: z.object({ content: z.string(), source: z.string() }),
  execute: async ({ inputData: url }) => ({
    content: await fetch(url).then(r => r.text()),
    source: url,
  }),
})

const chunkDocStep = createStep({
  id: 'chunk-doc',
  inputSchema: z.object({ content: z.string(), source: z.string() }),
  outputSchema: z.array(z.object({ chunk: z.string(), source: z.string() })),
  execute: async ({ inputData }) => {
    const chunks = inputData.content.match(/.{1,100}/g) || []
    return chunks.map(chunk => ({ chunk, source: inputData.source }))
  },
})

export const multiDocWorkflow = createWorkflow({
  id: 'multi-doc-rag',
  inputSchema: z.array(z.string()), // Array of URLs
  outputSchema: z.array(z.object({ embedding: z.array(z.number()) })),
})
  .foreach(downloadStep, { concurrency: 5 }) // Download docs in parallel
  .foreach(chunkDocStep) // Chunk each doc -> array of chunk arrays
  .map(async ({ inputData }) => {
    // Flatten nested arrays: [[chunks], [chunks]] -> [chunks]
    return inputData.flat()
  })
  .foreach(embedStep, { concurrency: 10 }) // Embed all chunks
  .commit()
串接 .foreach() 的重點:
- 每個
.foreach()都會處理前一步驟傳來的陣列 - 若
.foreach()內的步驟傳回陣列,輸出會成為陣列的陣列 - 必要時搭配使用
.map()與.flat(),將巢狀陣列攤平 - 對複雜的 RAG 管線而言,選項 1(在單一步驟中處理批次)通常能提供更佳的控制能力
foreach 內的巢狀 Workflow「foreach 內的巢狀 Workflow」的直接連結
接在 .foreach() 之後的步驟,只有在所有迭代完成後才會執行。若每個項目都需要執行多個連續作業,請使用巢狀 Workflow,而不要串接多個 .foreach() 呼叫。這能將每個項目的所有作業集中在一起,讓資料流程更清楚。
// Define a workflow that processes a single document
const processDocumentWorkflow = createWorkflow({
  id: 'process-document',
  inputSchema: z.object({ url: z.string() }),
  outputSchema: z.object({
    embeddings: z.array(z.array(z.number())),
    metadata: z.object({ url: z.string(), chunkCount: z.number() }),
  }),
})
  .then(downloadStep) // Download the document
  .then(chunkStep) // Split into chunks
  .then(embedChunksStep) // Embed all chunks for this document
  .then(formatResultStep) // Format the final output
  .commit()

// Use the nested workflow inside foreach
export const batchProcessWorkflow = createWorkflow({
  id: 'batch-process-documents',
  inputSchema: z.array(z.object({ url: z.string() })),
  outputSchema: z.array(
    z.object({
      embeddings: z.array(z.array(z.number())),
      metadata: z.object({ url: z.string(), chunkCount: z.number() }),
    }),
  ),
})
  .foreach(processDocumentWorkflow, { concurrency: 3 })
  .commit()

// Each document goes through all 4 steps before the next document starts (with concurrency: 1)
// With concurrency: 3, up to 3 documents process their full pipelines in parallel
使用巢狀 Workflow 的原因:
- 更佳的平行處理能力:使用
concurrency: N時,多個項目會同時執行各自的完整管線。串接的.foreach().foreach()會先讓所有項目完成步驟 1,等候後再全部執行步驟 2;巢狀 Workflow 則可讓每個項目獨立推進 - 收集結果前,同一項目的所有步驟會一起完成
- 比會建立巢狀陣列的多個
.foreach()呼叫更簡潔 - 每次巢狀 Workflow 執行都彼此獨立,並有自己的資料流程
- 更容易個別測試及重複使用每個項目的邏輯
運作方式:
- 父 Workflow 將每個陣列項目傳給一個巢狀 Workflow 執行個體
- 每個巢狀 Workflow 都會針對該項目執行完整的步驟序列
- 當
concurrency > 1時,多個巢狀 Workflow 會平行執行 - 巢狀 Workflow 的最終輸出會成為結果陣列中的一個元素
- 所有巢狀 Workflow 完成後,父 Workflow 的下一個步驟會收到完整陣列
選擇正確模式「選擇正確模式」的直接連結
選擇合適的控制流程方法時,可參考本節。
快速參考「快速參考」的直接連結
| 方法 | 用途 | 輸入 | 輸出 | 並行處理 |
|---|---|---|---|---|
.then(step) | 依序處理 | T | U | 不適用(一次一個) |
.parallel([a, b]) | 對相同輸入執行不同作業 | T | { a: U, b: V } | 全部同時執行 |
.foreach(step) | 對每個陣列項目執行相同作業 | T[] | U[] | 可設定(預設:1) |
.branch([...]) | 依條件選擇路徑 | T | { selectedStep: U } | 僅執行一個分支 |
.parallel() 與 .foreach() 的比較「parallel-vs-foreach」的直接連結
單一輸入需要不同處理方式時,請使用 .parallel():
// Same user data processed differently in parallel
workflow.parallel([validateStep, enrichStep, scoreStep]).then(combineResultsStep)
多個輸入需要相同處理方式時,請使用 .foreach():
// Multiple URLs each processed the same way
workflow.foreach(downloadStep, { concurrency: 5 }).then(aggregateStep)
適合使用巢狀 Workflow 的時機「適合使用巢狀 Workflow 的時機」的直接連結
在 .foreach() 內:當每個陣列項目都需要多個連續步驟時:
// Each document goes through a full pipeline
const processDocWorkflow = createWorkflow({...})
  .then(downloadStep)
  .then(parseStep)
  .then(embedStep)
  .commit();

workflow.foreach(processDocWorkflow, { concurrency: 3 })
單一 .foreach() 可讓結果保持扁平。串接 .foreach().foreach() 則會建立巢狀陣列。
在 .parallel() 內:當平行分支需要自己的多步驟管線時:
const pipelineA = createWorkflow({...}).then(step1).then(step2).commit();
const pipelineB = createWorkflow({...}).then(step3).then(step4).commit();

workflow.parallel([pipelineA, pipelineB])
串接模式「串接模式」的直接連結
| 模式 | 行為 | 常見使用情境 |
|---|---|---|
.then().then() | 依序執行步驟 | 簡單管線 |
.parallel().then() | 平行執行後再合併 | 扇出/扇入 |
.foreach().then() | 處理所有項目後再彙總 | Map-reduce |
.foreach().foreach() | 建立陣列的陣列 | 應避免;請使用巢狀 Workflow,或搭配 .map() 與 .flat() |
.foreach(workflow) | 每個項目各自執行完整管線 | 對每個陣列項目進行多步驟處理 |
同步:下一個步驟何時執行?「同步:下一個步驟何時執行?」的直接連結
.parallel() 與 .foreach() 都是同步點。只有在所有平行分支或所有陣列迭代完成後,Workflow 的下一個步驟才會執行。
workflow
  .parallel([stepA, stepB, stepC]) // All 3 run simultaneously
  .then(combineStep) // Waits for ALL 3 to finish before running
  .commit()

workflow
  .foreach(processStep, { concurrency: 5 }) // Up to 5 items process at once
  .then(aggregateStep) // Waits for ALL items to finish before running
  .commit()
這表示:
.parallel()會將所有分支輸出收集至一個物件,再傳給下一個步驟.foreach()會將所有迭代輸出收集至一個陣列,再傳給下一個步驟- 結果無法在完成時以「串流」方式傳給下一個步驟
並行處理行為「並行處理行為」的直接連結
| 方法 | 行為 |
|---|---|
.then() | 依序執行,一次一個步驟 |
.parallel() | 所有分支同時執行(無限制選項) |
.foreach() | 透過 { concurrency: N } 控制;預設為 1(依序執行) |
.foreach() 中的巢狀 Workflow | 遵循父 Workflow 的並行處理設定 |
效能提示: 對 .foreach() 中受 I/O 限制的作業,請提高並行數以平行處理項目:
// Process up to 10 items simultaneously
workflow.foreach(fetchDataStep, { concurrency: 10 })
循環管理「循環管理」的直接連結
你可以依希望循環如何結束,採用不同方式實作循環條件。
常見模式會檢查 inputData 傳回的值,並設定最大迭代次數。到達限制時,也可以中止執行。
中止循環「中止循環」的直接連結
使用 iterationCount 限制循環執行次數。若次數超過臨界值,請擲回錯誤,讓步驟失敗並停止 Workflow。
const step1 = createStep({...});

export const testWorkflow = createWorkflow({...})
  .dountil(step1, async ({ inputData: { userResponse, iterationCount } }) => {
    if (iterationCount >= 10) {
      throw new Error("Maximum iterations reached");
    }
    return userResponse === "yes";
  })
  .commit();