制御フロー
Workflowは事前定義された一連のタスクを実行し、その流れを制御できます。タスクはステップに分割され、要件に応じてさまざまな方法で実行できます。順次または並列で実行するほか、条件に基づいて異なる経路をたどることもできます。
各ステップは、データの制御と一貫性を保つ定義済みスキーマを介して、Workflow内の次のステップへ接続されます。
基本原則基本原則への直接リンク
- 最初のステップの
inputSchemaは、WorkflowのinputSchemaと一致する必要があります。 - 最後のステップの
outputSchemaは、WorkflowのoutputSchemaと一致する必要があります。 - 各ステップの
outputSchemaは、次のステップのinputSchemaと一致する必要があります。- 一致しない場合は、入力データのマッピングで必要な形に変換します。
.then()でステップを連結するchaining-steps-with-thenへの直接リンク
.then()を使うと、各ステップが直前のステップの結果にアクセスできる状態で、順番に実行できます。

const step1 = createStep({
  inputSchema: z.object({
    message: z.string(),
  }),
  outputSchema: z.object({
    formatted: z.string(),
  }),
})

const step2 = createStep({
  inputSchema: z.object({
    formatted: z.string(),
  }),
  outputSchema: z.object({
    emphasized: z.string(),
  }),
})

export const testWorkflow = createWorkflow({
  inputSchema: z.object({
    message: z.string(),
  }),
  outputSchema: z.object({
    emphasized: z.string(),
  }),
})
  .then(step1)
  .then(step2)
  .commit()
.parallel()でステップを同時実行するsimultaneous-steps-with-parallelへの直接リンク
.parallel()を使うと、ステップを同時に実行できます。Workflowが次のステップへ進む前に、すべての並列ステップが完了する必要があります。後続ステップのinputSchemaを定義する際には各ステップのidを使い、この値が前のステップの値へアクセスするinputDataオブジェクトのキーになります。後続ステップでは、並列ステップの出力を参照または結合できます。

const step1 = createStep({
  id: 'step-1',
})

const step2 = createStep({
  id: 'step-2',
})

const step3 = createStep({
  id: 'step-3',
  inputSchema: z.object({
    'step-1': z.object({
      formatted: z.string(),
    }),
    'step-2': z.object({
      emphasized: z.string(),
    }),
  }),
  outputSchema: z.object({
    combined: z.string(),
  }),
  execute: async ({ inputData }) => {
    const { formatted } = inputData['step-1']
    const { emphasized } = inputData['step-2']
    return {
      combined: `${formatted} | ${emphasized}`,
    }
  },
})

export const testWorkflow = createWorkflow({
  inputSchema: z.object({
    message: z.string(),
  }),
  outputSchema: z.object({
    combined: z.string(),
  }),
})
  .parallel([step1, step2])
  .then(step3)
  .commit()
出力構造出力構造への直接リンク
ステップを並列実行すると、各キーがステップのid、値がそのステップの出力であるオブジェクトが返されます。各並列ステップの結果へ個別にアクセスできます。
const step1 = createStep({
  id: 'format-step',
  inputSchema: z.object({ message: z.string() }),
  outputSchema: z.object({ formatted: z.string() }),
  execute: async ({ inputData }) => ({
    formatted: inputData.message.toUpperCase(),
  }),
})

const step2 = createStep({
  id: 'count-step',
  inputSchema: z.object({ message: z.string() }),
  outputSchema: z.object({ count: z.number() }),
  execute: async ({ inputData }) => ({
    count: inputData.message.length,
  }),
})

const step3 = createStep({
  id: 'combine-step',
  // The inputSchema must match the structure of parallel outputs
  inputSchema: z.object({
    'format-step': z.object({ formatted: z.string() }),
    'count-step': z.object({ count: z.number() }),
  }),
  outputSchema: z.object({ result: z.string() }),
  execute: async ({ inputData }) => {
    // Access each parallel step's output by its id
    const formatted = inputData['format-step'].formatted
    const count = inputData['count-step'].count
    return {
      result: `${formatted} (${count} characters)`,
    }
  },
})

export const testWorkflow = createWorkflow({
  id: 'parallel-output-example',
  inputSchema: z.object({ message: z.string() }),
  outputSchema: z.object({ result: z.string() }),
})
  .parallel([step1, step2])
  .then(step3)
  .commit()

// When executed with { message: "hello" }
// The parallel output structure will be:
// {
//   "format-step": { formatted: "HELLO" },
//   "count-step": { count: 5 }
// }
要点:
- 各並列ステップの出力では、その
idがキーになります - すべての並列ステップが同時に実行されます
- 次のステップは、すべての並列ステップの出力を含むオブジェクトを受け取ります
- 後続ステップの
inputSchemaは、この構造に合わせて定義する必要があります
ステップの失敗を処理するステップの失敗を処理するへの直接リンク
いずれかの並列ステップがエラーをスローすると、並列ブロック全体が失敗します。たとえば、複数の調査Agentのうち1つで認証トークンが期限切れになる可能性がある場合など、一部のステップが失敗しても継続できる並列Workflowを構築するには、ステップ内でtry/catchを使ってエラーを処理します。
const resilientStep = createStep({
  id: 'researcher',
  inputSchema: z.object({ query: z.string() }),
  outputSchema: z.object({
    brief: z.string().nullable(),
    failed: z.boolean(),
  }),
  execute: async ({ inputData }) => {
    try {
      const result = await fetchExternalData(inputData.query)
      return { brief: result, failed: false }
    } catch {
      return { brief: null, failed: true }
    }
  },
})
この方法では、ステップは常に型付きの結果を返して成功し、後続ステップで失敗した結果を除外できます。
const writerStep = createStep({
  id: 'writer',
  inputSchema: z.object({
    'researcher-a': z.object({ brief: z.string().nullable(), failed: z.boolean() }),
    'researcher-b': z.object({ brief: z.string().nullable(), failed: z.boolean() }),
  }),
  outputSchema: z.object({ synthesis: z.string() }),
  execute: async ({ inputData }) => {
    const briefs = Object.values(inputData)
      .filter(v => !v.failed && v.brief)
      .map(v => v.brief)
    return { synthesis: briefs.join('; ') }
  },
})
.parallel()と.foreach()の使い分けについては、適切なパターンを選ぶを参照してください。
.branch()による条件分岐conditional-logic-with-branchへの直接リンク
.branch()を使うと、条件に基づいて実行するステップを選択できます。分岐後に異なる経路をたどってもスキーマの一貫性を保つ必要があるため、分岐内のすべてのステップには同じinputSchemaとoutputSchemaが必要です。
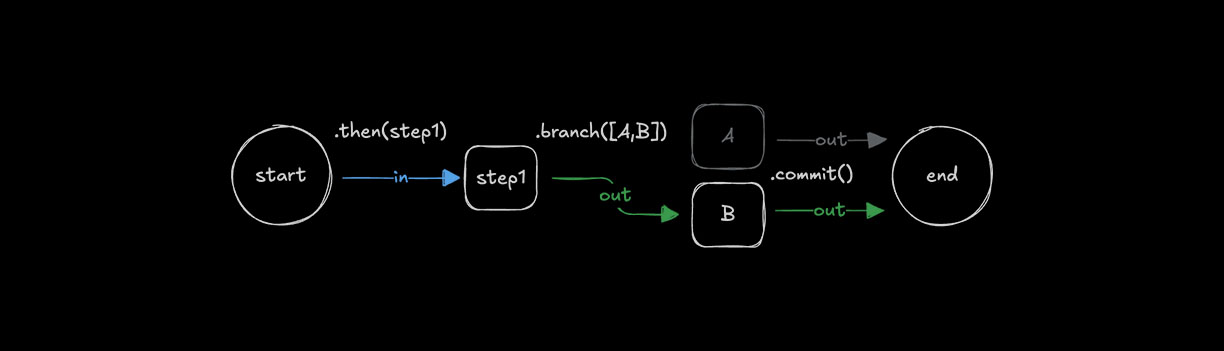
const step1 = createStep({...})

const stepA = createStep({
  inputSchema: z.object({
    value: z.number()
  }),
  outputSchema: z.object({
    result: z.string()
  })
});

const stepB = createStep({
  inputSchema: z.object({
    value: z.number()
  }),
  outputSchema: z.object({
    result: z.string()
  })
});

export const testWorkflow = createWorkflow({
  inputSchema: z.object({
    value: z.number()
  }),
  outputSchema: z.object({
    result: z.string()
  })
})
  .then(step1)
  .branch([
    [async ({ inputData: { value } }) => value > 10, stepA],
    [async ({ inputData: { value } }) => value <= 10, stepB]
  ])
  .commit();
出力構造出力構造への直接リンク
条件分岐では、最初にtrueと評価された条件に対応する分岐だけが実行されます。出力構造は.parallel()と似ており、実行されたステップのidが結果のキーになります。
const step1 = createStep({
  id: 'initial-step',
  inputSchema: z.object({ value: z.number() }),
  outputSchema: z.object({ value: z.number() }),
  execute: async ({ inputData }) => inputData,
})

const highValueStep = createStep({
  id: 'high-value-step',
  inputSchema: z.object({ value: z.number() }),
  outputSchema: z.object({ result: z.string() }),
  execute: async ({ inputData }) => ({
    result: `High value: ${inputData.value}`,
  }),
})

const lowValueStep = createStep({
  id: 'low-value-step',
  inputSchema: z.object({ value: z.number() }),
  outputSchema: z.object({ result: z.string() }),
  execute: async ({ inputData }) => ({
    result: `Low value: ${inputData.value}`,
  }),
})

const finalStep = createStep({
  id: 'final-step',
  // The inputSchema must account for either branch's output
  inputSchema: z.object({
    'high-value-step': z.object({ result: z.string() }).optional(),
    'low-value-step': z.object({ result: z.string() }).optional(),
  }),
  outputSchema: z.object({ message: z.string() }),
  execute: async ({ inputData }) => {
    // Only one branch will have executed
    const result = inputData['high-value-step']?.result || inputData['low-value-step']?.result
    return { message: result }
  },
})

export const testWorkflow = createWorkflow({
  id: 'branch-output-example',
  inputSchema: z.object({ value: z.number() }),
  outputSchema: z.object({ message: z.string() }),
})
  .then(step1)
  .branch([
    [async ({ inputData }) => inputData.value > 10, highValueStep],
    [async ({ inputData }) => inputData.value <= 10, lowValueStep],
  ])
  .then(finalStep)
  .commit()

// When executed with { value: 15 }
// Only the high-value-step executes, output structure:
// {
//   "high-value-step": { result: "High value: 15" }
// }

// When executed with { value: 5 }
// Only the low-value-step executes, output structure:
// {
//   "low-value-step": { result: "Low value: 5" }
// }
要点:
- 条件の評価順に基づき、1つの分岐だけが実行されます
- 実行されたステップの
idが出力のキーになります - 後続ステップでは、考えられるすべての分岐出力を処理する必要があります
- 次のステップで複数の分岐を処理する必要がある場合は、
inputSchemaでオプショナルフィールドを使います - 条件は定義順に評価されます
入力データのマッピング入力データのマッピングへの直接リンク
.then()、.parallel()、.branch()を使う際、前のステップの出力を次のステップの入力に合わせて変換する必要がある場合があります。この場合は.map()でinputDataへアクセスし、次のステップに適したデータ形状へ変換できます。

const step1 = createStep({...});
const step2 = createStep({...});

export const testWorkflow = createWorkflow({...})
  .then(step1)
  .map(async ({ inputData }) => {
    const { foo } = inputData;
    return {
      bar: `new ${foo}`,
    };
  })
  .then(step2)
  .commit();
.map()メソッドには、より複雑なマッピングに使える補助関数もあります。
利用可能な補助関数:
getStepResult(): 特定のステップの完全な出力へアクセスしますgetInitData<any>(): Workflowの初期入力データへアクセスしますmapVariable(): 宣言的なオブジェクト構文でフィールドを抽出し、名前を変更します
parallel と branch の出力parallel と branch の出力への直接リンク
.parallel()または.branch()の出力を扱う場合、次のステップへ渡す前に.map()でデータ構造を変換できます。出力をフラット化したり再構成したりする必要がある場合に特に便利です。
export const testWorkflow = createWorkflow({...})
  .parallel([step1, step2])
  .map(async ({ inputData }) => {
    // Transform the parallel output structure
    return {
      combined: `${inputData["step1"].value} - ${inputData["step2"].value}`
    };
  })
  .then(nextStep)
  .commit();
.map()が提供する補助関数も利用できます。
export const testWorkflow = createWorkflow({...})
  .branch([
    [condition1, stepA],
    [condition2, stepB]
  ])
  .map(async ({ inputData, getStepResult }) => {
    // Access specific step results
    const stepAResult = getStepResult("stepA");
    const stepBResult = getStepResult("stepB");

    // Return the result from whichever branch executed
    return stepAResult || stepBResult;
  })
  .then(nextStep)
  .commit();
ステップをループするステップをループするへの直接リンク
Workflowでは、条件が満たされるまで、または条件が満たされている間ステップを繰り返す方法や、配列を反復処理する方法を利用できます。ループは.then()などの他の制御メソッドと組み合わせられます。
.dountil()によるループlooping-with-dountilへの直接リンク
.dountil()を使うと、条件がtrueになるまでステップを繰り返し実行できます。
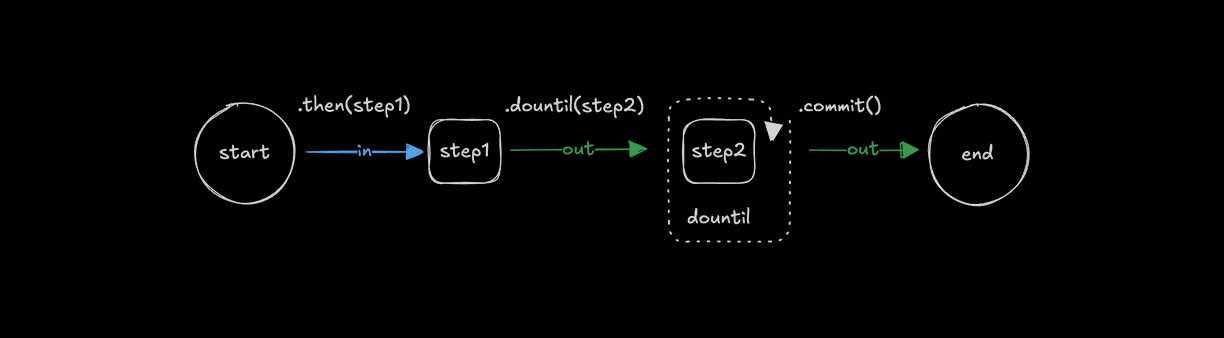
const step1 = createStep({...});

const step2 = createStep({
  execute: async ({ inputData }) => {
    const { number } = inputData;
    return {
      number: number + 1
    };
  }
});

export const testWorkflow = createWorkflow({})
  .then(step1)
  .dountil(step2, async ({ inputData: { number } }) => number > 10)
  .commit();
.dowhile()によるループlooping-with-dowhileへの直接リンク
.dowhile()を使うと、条件がtrueである間、ステップを繰り返し実行できます。
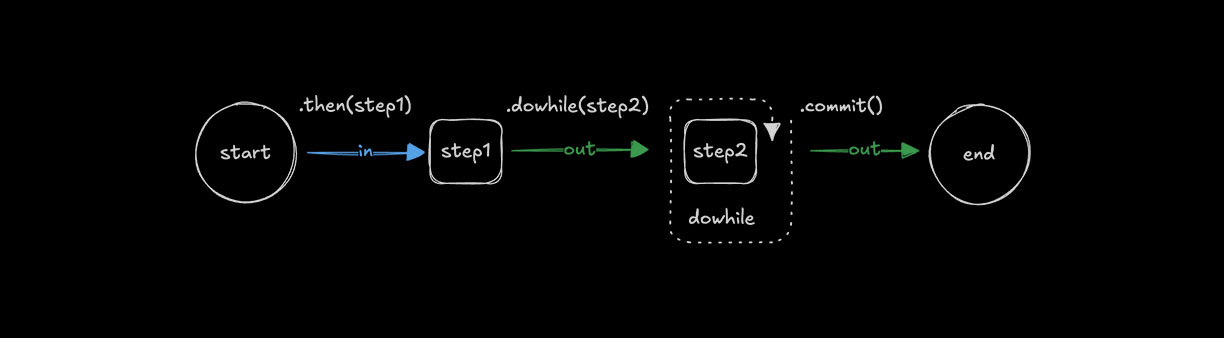
const step1 = createStep({...});

const step2 = createStep({
  execute: async ({ inputData }) => {
    const { number } = inputData;
    return {
      number: number + 1
    };
  }
});

export const testWorkflow = createWorkflow({})
  .then(step1)
  .dowhile(step2, async ({ inputData: { number } }) => number < 10)
  .commit();
.foreach()によるループlooping-with-foreachへの直接リンク
.foreach()を使うと、配列内の各項目に対して同じステップを実行できます。ループが値を反復処理して各項目にステップのロジックを適用できるよう、入力はarray型である必要があります。.foreach()と他のメソッドの使い分けについては、適切なパターンを選ぶを参照してください。
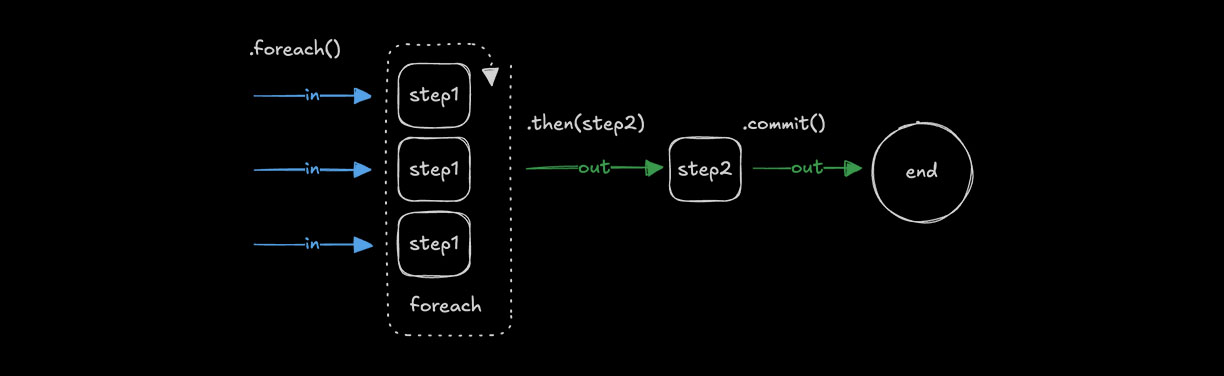
const step1 = createStep({
  inputSchema: z.string(),
  outputSchema: z.string(),
  execute: async ({ inputData }) => {
    return inputData.toUpperCase();
  }
});

const step2 = createStep({...});

export const testWorkflow = createWorkflow({
  inputSchema: z.array(z.string()),
  outputSchema: z.array(z.string())
})
  .foreach(step1)
  .then(step2)
  .commit();
出力構造出力構造への直接リンク
.foreach()メソッドは、各反復の出力を含む配列を必ず返します。出力の順序は入力の順序と一致します。
const addTenStep = createStep({
  id: 'add-ten',
  inputSchema: z.object({ value: z.number() }),
  outputSchema: z.object({ value: z.number() }),
  execute: async ({ inputData }) => ({
    value: inputData.value + 10,
  }),
})

export const testWorkflow = createWorkflow({
  id: 'foreach-output-example',
  inputSchema: z.array(z.object({ value: z.number() })),
  outputSchema: z.array(z.object({ value: z.number() })),
})
  .foreach(addTenStep)
  .commit()

// When executed with [{ value: 1 }, { value: 22 }, { value: 333 }]
// Output: [{ value: 11 }, { value: 32 }, { value: 343 }]
同時実行数の制限同時実行数の制限への直接リンク
concurrencyで、同時に処理する配列項目の数を制御します。デフォルトは1で、ステップを順次実行します。値を増やすと、.foreach()で複数の項目を同時に処理できます。
const step1 = createStep({...})

export const testWorkflow = createWorkflow({...})
  .foreach(step1, { concurrency: 4 })
  .commit();
.foreach()後に結果を集約するaggregating-results-after-foreachへの直接リンク
.foreach()は配列を出力するため、.then()または.map()で結果を集約、変換できます。.foreach()に続くステップは、配列全体を入力として受け取ります。
const processItemStep = createStep({
  id: 'process-item',
  inputSchema: z.object({ value: z.number() }),
  outputSchema: z.object({ processed: z.number() }),
  execute: async ({ inputData }) => ({
    processed: inputData.value * 2,
  }),
})

const aggregateStep = createStep({
  id: 'aggregate',
  // Input is an array of outputs from foreach
  inputSchema: z.array(z.object({ processed: z.number() })),
  outputSchema: z.object({ total: z.number() }),
  execute: async ({ inputData }) => ({
    // Sum all processed values
    total: inputData.reduce((sum, item) => sum + item.processed, 0),
  }),
})

export const testWorkflow = createWorkflow({
  id: 'foreach-aggregate-example',
  inputSchema: z.array(z.object({ value: z.number() })),
  outputSchema: z.object({ total: z.number() }),
})
  .foreach(processItemStep)
  .then(aggregateStep) // Receives the full array from foreach
  .commit()

// When executed with [{ value: 1 }, { value: 2 }, { value: 3 }]
// After foreach: [{ processed: 2 }, { processed: 4 }, { processed: 6 }]
// After aggregate: { total: 12 }
.map()で配列出力を変換することもできます。
export const testWorkflow = createWorkflow({...})
  .foreach(processItemStep)
  .map(async ({ inputData }) => ({
    // Transform the array into a different structure
    values: inputData.map(item => item.processed),
    count: inputData.length
  }))
  .then(nextStep)
  .commit();
複数の.foreach()呼び出しを連結するchaining-multiple-foreach-callsへの直接リンク
.foreach()呼び出しを連結すると、それぞれが前のステップの配列出力を処理します。配列内の各項目を複数のステップで順番に変換する場合に便利です。
const chunkStep = createStep({
  id: 'chunk',
  // Takes a document, returns an array of chunks
  inputSchema: z.object({ content: z.string() }),
  outputSchema: z.array(z.object({ chunk: z.string() })),
  execute: async ({ inputData }) => {
    // Split document into chunks
    const chunks = inputData.content.match(/.{1,100}/g) || []
    return chunks.map(chunk => ({ chunk }))
  },
})

const embedStep = createStep({
  id: 'embed',
  // Takes a single chunk, returns embedding
  inputSchema: z.object({ chunk: z.string() }),
  outputSchema: z.object({ embedding: z.array(z.number()) }),
  execute: async ({ inputData }) => ({
    embedding: [/* vector embedding */],
  }),
})

// For a single document that produces multiple chunks:
export const singleDocWorkflow = createWorkflow({
  id: 'single-doc-rag',
  inputSchema: z.object({ content: z.string() }),
  outputSchema: z.array(z.object({ embedding: z.array(z.number()) })),
})
  .then(chunkStep) // Returns array of chunks
  .foreach(embedStep) // Process each chunk -> array of embeddings
  .commit()
それぞれが複数のチャンクを生成する複数のドキュメントを処理する場合は、次の選択肢があります。
選択肢1: バッチ処理を制御しながら、すべてのドキュメントを1つのステップで処理する
const downloadAndChunkStep = createStep({
  id: "download-and-chunk",
  inputSchema: z.array(z.string()),  // Array of URLs
  outputSchema: z.array(z.object({ chunk: z.string(), source: z.string() })),
  execute: async ({ inputData: urls }) => {
    // Control batching/parallelization within the step
    const allChunks = [];
    for (const url of urls) {
      const content = await fetch(url).then(r => r.text());
      const chunks = content.match(/.{1,100}/g) || [];
      allChunks.push(...chunks.map(chunk => ({ chunk, source: url })));
    }
    return allChunks;
  }
});

export const multiDocWorkflow = createWorkflow({...})
  .then(downloadAndChunkStep)  // Returns flat array of all chunks
  .foreach(embedStep, { concurrency: 10 })  // Embed each chunk in parallel
  .commit();
選択肢2: ドキュメントにforeachを使ってチャンクを集約し、その後、埋め込みにもforeachを使う
const downloadStep = createStep({
  id: 'download',
  inputSchema: z.string(), // Single URL
  outputSchema: z.object({ content: z.string(), source: z.string() }),
  execute: async ({ inputData: url }) => ({
    content: await fetch(url).then(r => r.text()),
    source: url,
  }),
})

const chunkDocStep = createStep({
  id: 'chunk-doc',
  inputSchema: z.object({ content: z.string(), source: z.string() }),
  outputSchema: z.array(z.object({ chunk: z.string(), source: z.string() })),
  execute: async ({ inputData }) => {
    const chunks = inputData.content.match(/.{1,100}/g) || []
    return chunks.map(chunk => ({ chunk, source: inputData.source }))
  },
})

export const multiDocWorkflow = createWorkflow({
  id: 'multi-doc-rag',
  inputSchema: z.array(z.string()), // Array of URLs
  outputSchema: z.array(z.object({ embedding: z.array(z.number()) })),
})
  .foreach(downloadStep, { concurrency: 5 }) // Download docs in parallel
  .foreach(chunkDocStep) // Chunk each doc -> array of chunk arrays
  .map(async ({ inputData }) => {
    // Flatten nested arrays: [[chunks], [chunks]] -> [chunks]
    return inputData.flat()
  })
  .foreach(embedStep, { concurrency: 10 }) // Embed all chunks
  .commit()
.foreach()を連結する際の要点:
- 各
.foreach()は、前のステップから渡された配列を処理します .foreach()内のステップが配列を返すと、出力は配列の配列になります- 必要に応じて、
.map()と.flat()でネストされた配列をフラット化します - 複雑なRAGパイプラインでは、選択肢1(1つのステップ内でバッチ処理を扱う)の方が制御しやすいことがよくあります
foreach内でWorkflowをネストするforeach内でWorkflowをネストするへの直接リンク
.foreach()の後のステップは、すべての反復が完了してから実行されます。項目ごとに複数の操作を順次実行する必要がある場合は、複数の.foreach()呼び出しを連結せず、ネストされたWorkflowを使います。これにより、各項目のすべての操作がまとまり、データフローも明確になります。
// Define a workflow that processes a single document
const processDocumentWorkflow = createWorkflow({
  id: 'process-document',
  inputSchema: z.object({ url: z.string() }),
  outputSchema: z.object({
    embeddings: z.array(z.array(z.number())),
    metadata: z.object({ url: z.string(), chunkCount: z.number() }),
  }),
})
  .then(downloadStep) // Download the document
  .then(chunkStep) // Split into chunks
  .then(embedChunksStep) // Embed all chunks for this document
  .then(formatResultStep) // Format the final output
  .commit()

// Use the nested workflow inside foreach
export const batchProcessWorkflow = createWorkflow({
  id: 'batch-process-documents',
  inputSchema: z.array(z.object({ url: z.string() })),
  outputSchema: z.array(
    z.object({
      embeddings: z.array(z.array(z.number())),
      metadata: z.object({ url: z.string(), chunkCount: z.number() }),
    }),
  ),
})
  .foreach(processDocumentWorkflow, { concurrency: 3 })
  .commit()

// Each document goes through all 4 steps before the next document starts (with concurrency: 1)
// With concurrency: 3, up to 3 documents process their full pipelines in parallel
ネストされたWorkflowを使う理由:
- 並列性の向上:
concurrency: Nでは、複数の項目がそれぞれのパイプライン全体を同時に実行します。.foreach().foreach()の連結では、すべての項目がステップ1を通過するまで待ってからステップ2へ進みますが、ネストされたWorkflowでは各項目が独立して進みます - 結果を収集する前に、1つの項目に対するすべてのステップがまとまって完了します
- ネストされた配列を作る複数の
.foreach()呼び出しより簡潔です - ネストされた各Workflowの実行は独立し、それぞれ独自のデータフローを持ちます
- 項目ごとのロジックを個別にテストし、再利用しやすくなります
仕組み:
- 親Workflowが、配列の各項目をネストされたWorkflowのインスタンスへ渡します
- ネストされた各Workflowが、その項目に対してステップの全シーケンスを実行します
concurrency > 1の場合、複数のネストされたWorkflowが並列に実行されます- ネストされたWorkflowの最終出力が、結果配列の1要素になります
- すべてのネストされたWorkflowが完了すると、親の次のステップが配列全体を受け取ります
適切なパターンを選ぶ適切なパターンを選ぶへの直接リンク
適切な制御フローメソッドを選択する際のリファレンスとして、このセクションを利用してください。
クイックリファレンスクイックリファレンスへの直接リンク
| メソッド | 目的 | 入力 | 出力 | 同時実行 |
|---|---|---|---|---|
.then(step) | 順次処理 | T | U | 該当なし(1つずつ) |
.parallel([a, b]) | 同じ入力に異なる処理を実行 | T | { a: U, b: V } | すべて同時に実行 |
.foreach(step) | 配列の各項目に同じ処理を実行 | T[] | U[] | 設定可能(デフォルト: 1) |
.branch([...]) | 条件に応じて経路を選択 | T | { selectedStep: U } | 1つの分岐だけを実行 |
.parallel()と.foreach()の使い分けparallel-vs-foreachへの直接リンク
1つの入力に異なる処理が必要な場合は.parallel()を使います:
// Same user data processed differently in parallel
workflow.parallel([validateStep, enrichStep, scoreStep]).then(combineResultsStep)
多数の入力に同じ処理が必要な場合は.foreach()を使います:
// Multiple URLs each processed the same way
workflow.foreach(downloadStep, { concurrency: 5 }).then(aggregateStep)
ネストされたWorkflowを使う場面ネストされたWorkflowを使う場面への直接リンク
.foreach()内 - 配列の各項目に複数の順次ステップが必要な場合:
// Each document goes through a full pipeline
const processDocWorkflow = createWorkflow({...})
  .then(downloadStep)
  .then(parseStep)
  .then(embedStep)
  .commit();

workflow.foreach(processDocWorkflow, { concurrency: 3 })
1つの.foreach()なら結果はフラットなままです。.foreach().foreach()を連結するとネストされた配列が作られます。
.parallel()内 - 並列分岐に独自の複数ステップのパイプラインが必要な場合:
const pipelineA = createWorkflow({...}).then(step1).then(step2).commit();
const pipelineB = createWorkflow({...}).then(step3).then(step4).commit();

workflow.parallel([pipelineA, pipelineB])
連結パターン連結パターンへの直接リンク
| パターン | 動作 | 一般的な用途 |
|---|---|---|
.then().then() | ステップを順次実行 | 単純なパイプライン |
.parallel().then() | 並列実行後に結合 | ファンアウト/ファンイン |
.foreach().then() | すべての項目を処理後に集約 | MapReduce |
.foreach().foreach() | 配列の配列を作成 | 非推奨。ネストされたWorkflowまたは.map()と.flat()を使用 |
.foreach(workflow) | 項目ごとにパイプライン全体を実行 | 項目ごとの複数ステップ処理 |
同期: 次のステップが実行されるタイミング同期: 次のステップが実行されるタイミングへの直接リンク
.parallel()と.foreach()はいずれも同期ポイントです。Workflow内の次のステップは、すべての並列分岐または配列の全反復が完了した後にのみ実行されます。
workflow
  .parallel([stepA, stepB, stepC]) // All 3 run simultaneously
  .then(combineStep) // Waits for ALL 3 to finish before running
  .commit()

workflow
  .foreach(processStep, { concurrency: 5 }) // Up to 5 items process at once
  .then(aggregateStep) // Waits for ALL items to finish before running
  .commit()
つまり、次のように動作します。
.parallel()はすべての分岐出力をオブジェクトへ収集し、次のステップへ渡します.foreach()はすべての反復出力を配列へ収集し、次のステップへ渡します- 結果が完了するたびに次のステップへ「ストリーミング」することはできません
同時実行の動作同時実行の動作への直接リンク
| メソッド | 動作 |
|---|---|
.then() | 順次実行。一度に1ステップ |
.parallel() | すべての分岐を同時実行(上限のオプションなし) |
.foreach() | { concurrency: N }で制御。デフォルトは1(順次実行) |
.foreach()内のネストされたWorkflow | 親の同時実行設定に従う |
パフォーマンスのヒント: .foreach()でI/Oバウンドな処理を実行する場合は、同時実行数を増やして項目を並列処理します。
// Process up to 10 items simultaneously
workflow.foreach(fetchDataStep, { concurrency: 10 })
ループ管理ループ管理への直接リンク
ループの終了方法に応じて、ループ条件をさまざまな方法で実装できます。
一般的なパターンでは、inputDataで返された値を確認し、最大反復回数を設定します。上限に達したときに実行を中止することもできます。
ループを中止するループを中止するへの直接リンク
iterationCountを使ってループの実行回数を制限します。回数がしきい値を超えたらエラーをスローし、ステップを失敗させてWorkflowを停止します。
const step1 = createStep({...});

export const testWorkflow = createWorkflow({...})
  .dountil(step1, async ({ inputData: { userResponse, iterationCount } }) => {
    if (iterationCount >= 10) {
      throw new Error("Maximum iterations reached");
    }
    return userResponse === "yes";
  })
  .commit();